How We Do Kitchen Demo Right
Learn the professional approach to kitchen demolition that ensures safety, efficiency, and sets the foundation for your dream kitchen renovation.
Kitchen demolition is one of the most critical phases of any kitchen renovation project. At WDDR, we've completed hundreds of kitchen demolitions across Alabama, Georgia, Louisiana, Texas, and Tennessee, and we've learned that doing it right from the start sets the tone for the entire renovation. This comprehensive guide walks you through exactly how we approach kitchen demolition to ensure safety, efficiency, and protection of your home.
STEP 1: PLANNING AND ASSESSMENT
Before we swing a single hammer, we conduct a thorough assessment of your kitchen. This includes identifying potential hazards like asbestos in older homes, lead paint, mold, and structural concerns. We photograph everything and create a detailed demolition plan that outlines the sequence of work, safety protocols, and waste management strategy. This planning phase typically takes 2-3 days and is absolutely crucial to avoiding costly mistakes.
We also identify all utilities—electrical, plumbing, and gas—and ensure they're properly disconnected or rerouted. We never cut into walls without knowing exactly what's behind them. This is where professional expertise makes all the difference.
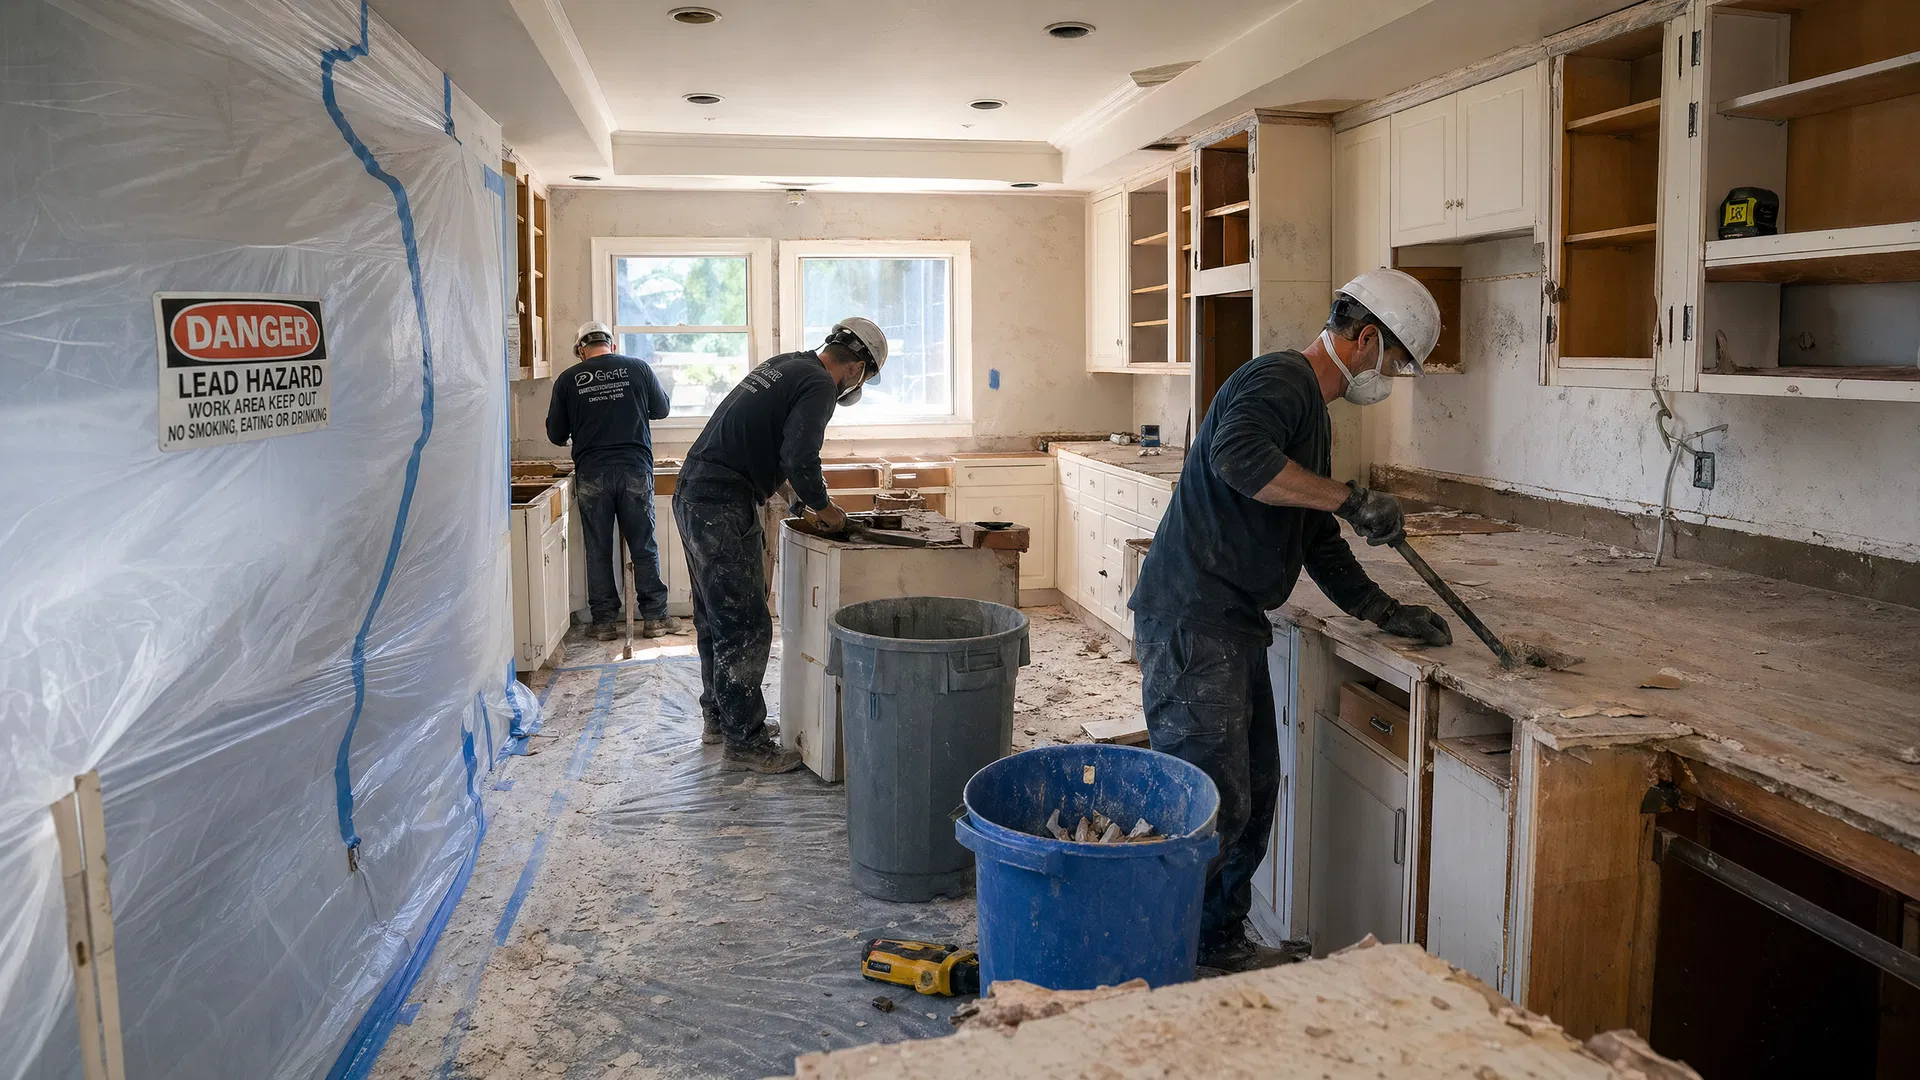
STEP 2: PROTECTION AND CONTAINMENT
The second step is protecting the rest of your home from dust and debris. We seal off the kitchen with plastic sheeting and establish negative air pressure using industrial-grade air scrubbers. This prevents dust from traveling into your living spaces, bedrooms, and other areas. We also protect all flooring with heavy-duty cardboard and plastic, and we establish a clear debris removal pathway.
This containment phase typically takes one full day but saves weeks of cleanup headaches. Homeowners are often shocked at how much dust kitchen demolition generates, and proper containment is the only way to manage it effectively.
STEP 3: APPLIANCE AND FIXTURE REMOVAL
We start by removing appliances, which are often the heaviest items. We carefully disconnect gas lines, electrical connections, and water lines. Refrigerators, ranges, dishwashers, and microwaves are removed with care to avoid damage to surrounding cabinetry and walls.
Next, we remove fixtures like faucets, sinks, and light fixtures. We carefully photograph and label all electrical connections before disconnecting anything. This documentation is invaluable when it's time to reinstall or upgrade fixtures.
STEP 4: CABINET AND COUNTERTOP REMOVAL
Cabinet removal is where the real work begins. We use oscillating multi-tools and reciprocating saws to carefully cut through caulk and adhesive. We remove cabinets section by section, starting with upper cabinets and working our way down. This prevents debris from falling onto lower cabinets and damaging them.
Countertops are removed next, typically using a combination of pry bars and pneumatic tools. We're careful to protect the underlying cabinetry and substrate during this phase. Granite and quartz countertops require extra care due to their weight and brittleness.
STEP 5: WALL AND FLOORING PREPARATION
Once cabinets and countertops are removed, we assess the walls and flooring. We remove backsplash tiles, drywall if necessary, and old flooring. This is when we often discover hidden issues—water damage, rot, or structural problems—that need to be addressed before the new kitchen is installed.
We remove old flooring carefully to avoid damaging the subfloor. If the subfloor is damaged, we repair or replace it now. This is the time to address any structural or moisture issues that could compromise your new kitchen.
STEP 6: WASTE REMOVAL AND CLEANUP
Throughout the demolition process, we're continuously removing waste. We use dumpsters or haul-away services to remove debris responsibly. We recycle materials whenever possible, including metals, wood, and cardboard.
The final cleanup is thorough. We remove all plastic sheeting, sweep and vacuum multiple times, and ensure your home is clean and ready for the next phase of renovation. We typically leave the kitchen in a condition where construction can begin immediately.
SAFETY CONSIDERATIONS
Kitchen demolition involves several hazards that must be managed carefully. Asbestos, commonly found in homes built before 1980, requires professional abatement. Lead paint, also common in older homes, requires careful containment and removal. Electrical hazards, gas line hazards, and heavy lifting injuries are all real risks that require trained professionals.
We ensure all team members wear proper safety equipment including respirators, gloves, safety glasses, and steel-toed boots. We follow OSHA guidelines and maintain comprehensive insurance coverage.
WHY PROFESSIONAL DEMOLITION MATTERS
While some homeowners consider DIY demolition to save money, professional demolition typically costs between $3,000 and $8,000 and is worth every penny. Professional demolition is faster, safer, and more thorough. We identify hidden problems early, prevent damage to surrounding areas, and ensure proper waste disposal.
The time saved alone is significant—a professional team can complete a kitchen demolition in 3-5 days, while a DIY approach typically takes 2-3 weeks of evenings and weekends.
NEXT STEPS
Once demolition is complete, your kitchen is ready for the exciting part—building your new dream kitchen. Whether you're planning a modern update, a classic renovation, or a complete gut renovation, starting with a professional demolition ensures your new kitchen is built on a solid foundation.
At WDDR, we don't just demolish kitchens—we prepare them for transformation. Our meticulous approach to kitchen demolition has earned us the trust of hundreds of homeowners across the Southeast. If you're planning a kitchen renovation and need professional demolition services, contact us today for a free consultation.
Found this helpful? Share it with your network!